«Last Updated on December 7, 2023 »
Class design by Kane, Graphics by Zorg
NOTES:
Known sphere Of Operation: Union-wide use
Data Reliability: C for Type-1, D for Type-2, B for Type-3 and Type-4
Major Data Source: Cardassian Sector Intelligence
The Aladara class was once one of the most revered combat platforms in the Cardassian fleet. Although production of the Aladara was long finished before direct hostilities with the Federation began, it is believed that the popular class would have bested most Federation destroyers of the period.
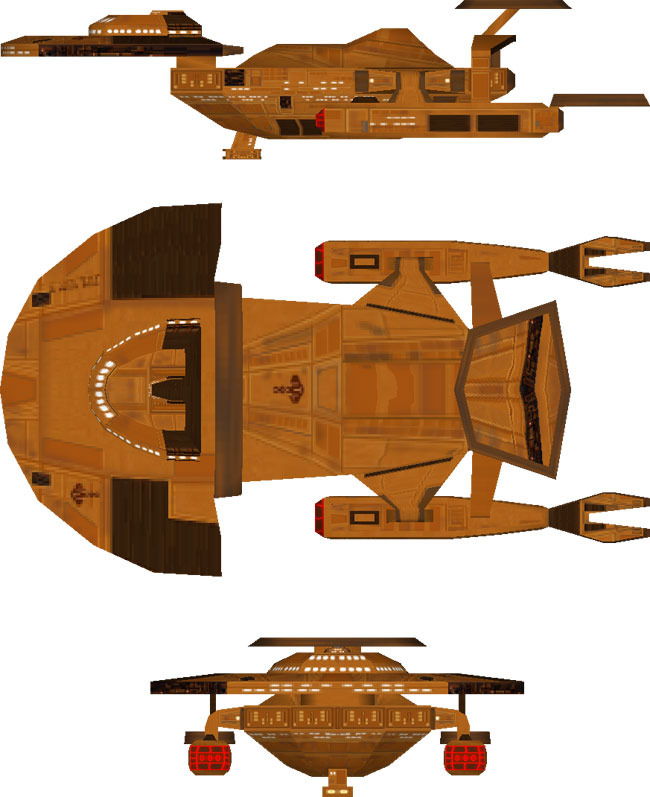
The design it self was typical of Cardassian ships, with a large forward hull housing the main warp coils. Two weapons pods were also fitted, leaving ample internal volume for crew support. The weapon pods also allowed quick refitting after prolonged combat. Coupled with the enlarged recreational facilities afforded to the main hull, the Aladar became a popular vessel among front line commander and crews alike.
The Type-1 was outfitted with the standard CWC-2 warp drive system, which allowed the vessel excellent power transfer to the maneuvering system and well balanced warp capability. The Aladar could maintain its standard warp speed for several days when needed and operate at emergency warp speed for over 20 hours before major warp coil degradation. The Type-1 also mounted a large impulse engine that gave the vessel excellent reserve power.
The Type-1 was most well known for it’s two large forward disruptors. These two heavy weapons could easily push through the strongest shields of the period and cause significant damage to all but the largest enemy vessel. Coupled with the twin torpedo launchers, the Aladar was a formidable opponent at close range. However, the Type-1 did suffer from several drawback common to Cardassian vessels. Like many Cardassian naval vessels, the wing-like warp structure reduced the effectiveness of the notoriously underwhelming Cardassian sensors. The main sensors were eventually placed in an external sensor housing mounted on the rear of the craft. A smaller crew also meant maintenance was often more rigorous longer on-duty shifts were not uncommon. Yet the vessels extensive recreation facility and roomy quarters remained the Aladar’s main draw for crew and officer alike.
The Type-1 saw extensive interaction with the Tallarians, Breen and eventually was a major player in the first war with the Klingons. The Type-1 was produced at the Manora, Monac and Tevak shipyards. Production reached a peak of 15 vessels per year before mainline production was eventually halted in 2292. Of the 203 built, 2 are listed as missing, believed captured by the Klingons, 9 have been destroyed, 2 are listed as captured (1 by the Klingons and 1 by the Breen), 11 have been scrapped and 179 were converted to Type-2s.
The Type-2 was the first update of the Aladara and saw in improvement to heavy disruptor as well as an enlarged impulse drive. Although expensive, there improvements made the Aladara even more popular. Of the 179 fielded, 4 Type-2s were destroyed, 10 were placed in reserve fleets, and 3 were scrapped. the remaining 162 were converted to Type-3s.
The Type-3 once again saw an improvement in the weapons system increasing the torpedo firepower and the shield system improving the overall protection afforded the vessel. The Type-3 saw combat with the Klingons, and the Tallarians. Of the 162 fielded, 5 were destroyed, 1 is listed as missing and 4 were scrapped.
The Type-4, launched in 2357 would see more combat than any previous version. Nearly all 152 fielded would engage in combat with the Klingons, Federation, Breen and other combatants., eventually serving during the Dominion war. With an improved beam weapon system and torpedoes, the Type-4 was still considered lacking when compared to its contemporaries in other military services. With the lack of resources plaguing the Cardassian Union, many felt that the further updates to the Aladara should include increasing the overall size and weapon load. However, the Cardassian’s entry into the Dominion shifted resources away from ship improvements during the early days of the conflict. None the less, the Type-4 continued to operate in conjunction with Dominion forces. In early 2375, a large number of Aladara class vessels were sent to the Monac shipyards with the intent of creating a more combat capable Type-5. However, the shipyard was destroyed before construction was started. Of the 152 Type-4s fielded, 4 were captured (2 by Federation forces, 1 by the Klingons and 1 by the Romulans), 88 were destroyed (67 were destroyed in the destruction of the Monac shipyards). 4 are listed as missing. 46 were scrapped (21 of which were severely damaged in the loss of Monac). There are currently 10 remaining ship in reserve fleet.
| Construction Data: | ||||
| Model Number — | Type-1 | Type-2 | Type-3 | Type-4 |
| Ship Class — | IX | IX | IX | IX |
| Date Entering Service — | 2277 | 2293 | 2326 | 2357 |
| Number Constructed — | 203 | Refit | Refit | Refit |
| Hull Data: | ||||
| Superstructure Points — | 26 | 28 | 28 | 28 |
| Damage Chart — | A | A | A | A |
| Size: | ||||
| Length — | 272 m | 272 m | 272 m | 272 m |
| Width — | 156 m | 156 m | 156 m | 156 m |
| Height — | 66 m | 66 m | 66 m | 66 m |
| Weight — | 135,516 mt | 139,228 mt | 139,817 mt | 139,607 mt |
| Cargo: | ||||
| Cargo Units — | 240 SCU | 240 SCU | 240 SCU | 240 SCU |
| Cargo Capacity — | 12,000 mt | 12,000 mt | 12,000 mt | 12,000 mt |
| Landing Capacity — | None | None | None | None |
| Equipment Date: | ||||
| Control Computer Type — | CO-6a | CO-6a | CO-6a | CO-6a |
| Transporters: | ||||
| Standard 3-person — | 4 | 4 | 4 | 4 |
| Cargo — | 2 | 2 | 2 | 2 |
| Other Data: | ||||
| Crew — | 263 | 263 | 263 | 263 |
| Troops — | 60 | 60 | 60 | 60 |
| Passengers — | 30 | 30 | 30 | 30 |
| Shuttlecraft — | 6 | 6 | 6 | 6 |
| Engines And Power Data: | ||||
| Total Power Units Available — | 46 | 49 | 52 | 58 |
| Movement Point Ratio — | 3/1 | 3/1 | 3/1 | 3/1 |
| Warp Engine Type — | CWC-2 | CWC-2 | CWC-2 | CWC-2 |
| Number — | 2 | 2 | 2 | 2 |
| Power Units Available — | 18 ea. | 18 ea. | 18 ea. | 18 ea. |
| Stress Charts — | O/M | O/M | O/M | O/M |
| Max Safe Cruising Speed — | Warp 7 | Warp 7 | Warp 7 | Warp 7 |
| Emergency Speed — | Warp 8 | Warp 8 | Warp 8 | Warp 8 |
| Impulse Engine Type — | CID-1 | CID-2 | CIE-1 | CIF-1 |
| Power Units Available — | 10 | 13 | 16 | 22 |
| Weapons And Firing Data: | ||||
| Beam Weapon Type — | CD-6 | CD-6 | CD-6 | CD-13 |
| Number — | 4 | 4 | 4 | 4 |
| Firing Arcs — | 1 f/p, 1 f/s, | 1 f/p, 1 f/s, | 1 f/p, 1 f/s, | 1 f/p, 1 f/s, |
| 1 p/f/s, 1 p/a/s | 1 p/f/s, 1 p/a/s | 1 p/f/s, 1 p/a/s | 1 p/f/s, 1 p/a/s | |
| Firing Chart — | T | T | T | Y |
| Maximum Power — | 8 | 8 | 8 | 8 |
| Damage Modifiers: | ||||
| +3 | (1-5) | (1-5) | (1-5) | (1-8) |
| +2 | (6-10) | (6-10) | (6-10) | (9-19) |
| +1 | (11-18) | (11-18) | (11-18) | (20-21) |
| Beam Weapon Type — | CSD-3 | CSD-4 | CSD-4 | CSD-4 |
| Number — | 2 | 2 | 2 | 2 |
| Firing Arcs — | 2 f | 2 f | 2 f | 2 f |
| Firing Chart — | J | N | N | N |
| Maximum Power — | 13 | 20 | 20 | 20 |
| Damage Modifiers: | ||||
| +3 | (-) | (-) | (-) | (-) |
| +2 | (-) | (1-5) | (1-5) | (1-5) |
| +1 | (1-10) | (6-13) | (6-13) | (6-13) |
| Torpedo Weapon Type — | CP-5 | CP-5 | CP-10 | CP-11 |
| Number — | 2 | 2 | 2 | 2 |
| Firing Arcs — | 2 f | 2 f | 2 f | 2 f |
| Firing Chart — | P | P | R | R |
| Power to Arm — | 1 | 1 | 1 | 1 |
| Damage — | 16 | 16 | 20 | 38 |
| Shield Data: | ||||
| Deflector Shield Type — | CSI | CSI | CSP | CSP |
| Shield Point Ratio — | 1/3 | 1/3 | 1/3 | 1/3 |
| Maximum Shield Power — | 12 | 12 | 30 | 30 |
| Combat Efficiency: | ||||
| D — | 119.7 | 125.5 | 155.5 | 163.0 |
| WDF — | 54.2 | 64.2 | 70.6 | 101.6 |