«Last Updated on July 12, 2022 »

NEW DEIMOS
STARDATE: 2/0904.13, EN ROUTE TO NEW DEIMOS, 1119 HRS FST

   
JUST ANOTHER DAY :
USS Bainbridge
“Captains log supplemental, Stardate 2/0904, we have once more dropped out of warp at the request of the freighter ‘happy go lucky’ for me to resolve an issue that the vessels captain again tells me only a person of my rank and experience can resolve? I am going to beam over and clear this up as quickly as possible as we are already almost two days behind schedule.”

10 minutes later…
Aboard the USS Bainbridge, “Sir, unidentified vessel has been detected coming around the back side of the planet”

“Go to tactical alert, but do not raise shields or arm weapons at this time. Get the Captain back aboard now!”


GAME SET-UP

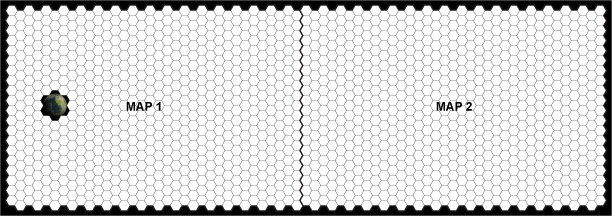
Lay out two Star Trek Combat Simulator map-sheet in the configuration shown. Place 1 planet in the center of the maps. This represents the area of space where the conflict takes place. All vessels travel at sub-light speed. Use the Graduate Starship Tactics Course rules in this scenario.

Defender
The Defending force consists of:

1 Loknar MK II Class VIII Fast Frigate (USS Bainbridge)
2 Hotspur MK II Class V Medium Corvettes (USS Havoc, USS Hyperion)
2 Cochrane MK I Class VI Colonial Transports (USS Happy go lucky, USS Mom’s Pride)
4 Cochrane MK II Class VI Colonial Transport (USS Hummingbird, USS Isabella, USS Nebuchadnezzar, USS Haul Yo’ ass)

Deployment
The Defending force deploys in any formation within 10 hexes of the bottom right corner of the map. The Bainbridge and Happy Go Lucky must be in adjacent hexes within this area.

Attacker
The Attacking force consists of:

1 CB-17 A Class VI Battlescout (Dreadclaw)
3 IB-2 A Class V Combat Corvettes (Ambush, Night Prowler, Sun Render)

Deployment
The Dreadclaw begins the combat 4 hexes from the planet, with within the line of sight of at least one Federation vessel.

The Night Prowler and Sun Render arrive on phase 3 of turn 2 and enter from the bottom left corner of the map.

The Ambush arrives at on phase 3 of turn 4 from anywhere along the left map edge.

Victory Conditions:
The attacker wins a major victory by destroying all the Federation vessels before they are able to transport any colonists to the planets surface. The attacker wins a minor victory if they are able to destroy all the Federation vessels but are unable to prevent survivors from beaming to the planet. The attacker suffers a major defeat if any of their ships are destroyed.

SPECIAL RULES:

Reluctance to Fire:
The federation player cannot fire weapons until fired upon first by the Gorn player. However, if more than one player is controlling the Federation forces then any of the freighters may choose to fire at any point!

Lack of Information:
The Federation player(s) have no information, at all, about the attacking ships; they will have to use parts 4-7 of the game turn (page 24 of rule book) to gather any information about the enemy vessels. There is NO information available in the ships library. Until one or more Gorn ships are scanned, the Federation player had a -1 to all attack rolls.

Escape:
No Federation ship may escape by going to warp. Float the map to accommodate any vessels that move off a map edge.

Planetary Beam Down:
Once combat begins, the Federation player may transport the colonists to the planet in an attempt to keep them safe. Transport requires the designated ship to be 4 hexes from the planet with it’s shields down for transport. The transporting ship must remain ‘in orbit’ for the full turn with it’s shields down. To evacuate all the colonists from any of the colonial transports requires 3 turns. If the ship takes damage during transport, the colonists are ‘lost’.

Ending:
The scenario ends when all the Federation vessels are destroyed.


This scenario depicts the possible final actions of the ill-fated Federation convoy en-route to New Deimos as mentioned on page 33 of the first edition Federation ship recognition manual (2302).
designed by Jim McLeod – June 2022