«Last Updated on January 2, 2024 »
from Ships of the Star Fleet – Volume One, by Calon Riel & Mastercom Data Center
NOTES:
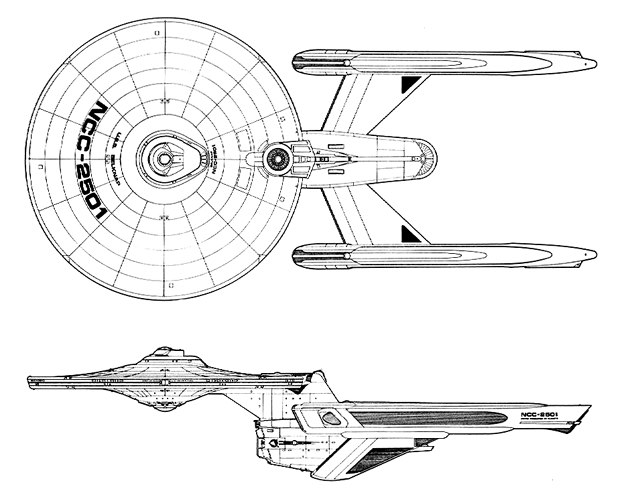
The Belknap class of strike cruiser is considered one of the finest examples of Star Fleet engineering since the Constitution class was first commissioned. Few vessels have captured the attention of captains and crews alike. Produced as a companion to the Enterprise refit, the Belknap continues to be one of the sought after commands along the boarders of the Federation.
The main systems of the Belknap are little different front her larger cousin, the Enterprise class. The class uses the standard FWG power-plant with two low slung FWG-1 warp nacelles. After the V’Ger incident, the decision was made to use the FWG-1 system rather than the FWD power-plant. The nacelle placement was chosen after several years of testing with the USS Decatur, the test bed for the Belknap class. The FWG-1 was more fuel intensive and required a larger intermix chamber than the FWD system, but provided greater levels of pure plasma for the warp coils.
The Mk I was launched in 2274 to help protect the volatile Klingon boarder and provide a smaller but equally capable platform to conduct research and first contact missions. It’s strike capability was intended to be in concert with other front-line strike vessels should relations with the Klingon deteriorate further. The Mk I was equipped with seven standard phasers, including one bank near the joint line of the warp engines. A lighter aft firing phaser emplacement was also incorporated to provide aft firepower should it be necessary. Twin torpedo tubes and the FSP shielding system rounded out the design capabilities.
The Mk II was launched in 2281 with the final two hulls slightly modified. An additional aft firing weapon emplacement was added as was an updated secondary sensor system.
In late 2288, the decision was made to upgrade the Belknap class with an enlarged impulse drive. The aft weapon was also upgraded to provide longer range. In 2297, the two late model Belknaps were also upgraded. In addition to the FIF-1 impulse drive, the primary torpedo system was enlarged with the more powerful FP-9 system.
By 2315, several space frames were nearing their 30 year design mark, and some felt that the needed upgrades to the Belknap’s spaceframe would prove too costly. However, with the recent Romulan conflict still on many minds, the decision to move forward with the spaceframe upgrades was approved and by 2316 the Mk V had been fielded. The Mk V saw several primary systems significantly upgraded, including the main computer, warp drive and impulse drive. More powerful primary and secondary phasers as well as an improved shield system gave the Belknap a second life on the front lines.
While the Belknap served well as a patrol vessel and better than expected as an exploratory vessel, by the early 2320’s many in Star Fleet were aware that relations with the Tzenkethi were once again strained. Although some had planned to mothball the Belknap by 2330, a call to upgrade the vessel was made and in 2322, the Mk VI was fielded. The Mk VI saw the upgrade again of the primary and secondary phasers as well as an improved shield system. These proved vital in the coming conflict with the Tzenkethi, and the Belknap served with distinction and success in nearly ever one of its engagements during that conflict.
Because of the significant investment in space-frame refurbishment, all active Belknaps are considered new hulls as of 2329. The Belknaps are expected to serve well into the 2340 and perhaps beyond.
| Construction Data: | ||||||||||
| Model – | Mk I | Mk II | Mk III | Mk IV | Mk V | Mk VI | Mk VII | Mk VIII | Mk IX | Mk X |
| Ship Class – | X | X | X | X | X | X | X | X | X | X |
| Date Entering Service – | 2274 | 2281 | 2289 | 2297 | 2316 | 2322 | 2343 | 2350 | 2361 | 2370 |
| Number Constructed – | 26 | 2 | Refit | Refit | Refit | Refit | Refit | Refit | Refit | Refit |
| Hull Data: | ||||||||||
| Superstructure Points – | 31 | 31 | 31 | 31 | 40 | 40 | 42 | 42 | 42 | 42 |
| Damage Chart – | C | C | C | C | C | C | C | C | C | C |
| Size: | ||||||||||
| Length – | 290 m | 290 m | 290 m | 290 m | 290 m | 290 m | 290 m | 290 m | 290 m | 290 m |
| Width – | 141 m | 141 m | 141 m | 141 m | 141 m | 141 m | 141 m | 141 m | 141 m | 141 m |
| Height – | 68 m | 68 m | 68 m | 68 m | 68 m | 68 m | 68 m | 68 m | 68 m | 68 m |
| Weight – | 158,835 mt | 159,435 mt | 159,188 mt | 159,908 mt | 156,073 mt | 157,883 mt | 156,351 mt | 157,851 mt | 157,652 mt | 158,880 mt |
| Cargo: | ||||||||||
| Total SCU – | 410 SCU | 410 SCU | 410 SCU | 410 SCU | 410 SCU | 410 SCU | 410 SCU | 410 SCU | 410 SCU | 410 SCU |
| Cargo Capacity – | 20,500 mt | 20,500 mt | 20,500 mt | 20,500 mt | 20,500 mt | 20,500 mt | 20,500 mt | 20,500 mt | 20,500 mt | 20,500 mt |
| Landing Capacity – | None | None | None | None | None | None | None | None | None | None |
| Equipment Date: | ||||||||||
| Control Computer Type – | M-6A | M-6A | M-6A | M-6A | M-7a | M-7a | I-6 | I-6 | I-6 | I-6 |
| Transporters: | ||||||||||
| Standard 6-person – | 3 | 3 | 3 | 3 | 3 | 3 | 3 | 3 | 3 | 3 |
| Emergency 22-person – | 3 | 3 | 3 | 3 | 3 | 3 | 3 | 3 | 3 | 3 |
| Cargo – | 3 | 3 | 3 | 3 | 3 | 3 | 3 | 3 | 3 | 3 |
| Other Data: | ||||||||||
| Crew – | 395 | 401 | 410 | 411 | 410 | 411 | 411 | 411 | 411 | 411 |
| Passengers – | 40 | 40 | 40 | 40 | 40 | 40 | 40 | 40 | 40 | 40 |
| Shuttlecraft – | 16 | 16 | 16 | 16 | 16 | 16 | 16 | 16 | 16 | 16 |
| Engines And Power Data: | ||||||||||
| Total Power Units Available – | 60 | 60 | 64 | 64 | 66 | 66 | 70 | 78 | 86 | 86 |
| Movement Point Ratio – | 4/1 | 4/1 | 4/1 | 4/1 | 4/1 | 4/1 | 4/1 | 4/1 | 4/1 | 4/1 |
| Warp Engine Type – | FWG-1 | FWG-1 | FWG-1 | FWG-1 | FWL-2 | FWL-2 | FNWD-2a | FNWD-2b | FNWD-2b | FNWD-2b |
| Number – | 2 | 2 | 2 | 2 | 2 | 2 | 2 | 2 | 2 | 2 |
| Power Units Available – | 26 ea. | 26 ea. | 26 ea. | 26 ea. | 25 ea. | 25 ea. | 23 ea. | 27 ea. | 27 ea. | 27 ea. |
| Stress Chart – | D/F | D/F | D/F | D/F | E/F | E/F | C/D | C/D | C/D | C/D |
| Max Safe Cruising Speed – | Warp 8 | Warp 8 | Warp 8 | Warp 8 | Warp 8 | Warp 8 | Warp 8 | Warp 8 | Warp 8 | Warp 8 |
| Emergency Speed – | Warp 10 | Warp 10 | Warp 10 | Warp 10 | Warp 10 | Warp 10 | Warp 10 | Warp 10 | Warp 10 | Warp 10 |
| Impulse Engine Type – | FIE-2 | FIE-2 | FIF-1 | FIF-1 | FIF-2 | FIF-2 | FIG-1 | FIG-1 | FIJ-4 | FIJ-4 |
| Power Units Available – | 8 | 8 | 12 | 12 | 16 | 16 | 24 | 24 | 32 | 32 |
| Weapons And Firing Data: | ||||||||||
| Beam Weapon Type – | FH-11 | FH-11 | FH-11 | FH-11 | FH-18 | FH-19 | FNH-17 | FNH-23 | FNH-28 | FNH-28 |
| Number – | 7 | 8 | 7 | 8 | 7 | 8 | 7 | 8 | 8 | 8 |
| Firing Arcs – | 2 f/p, 3 f, | 2 f/p, 2 f, | 2 f/p, 3 f, | 2 f/p, 2 f, | 2 f/p, 3 f, | 2 f/p, 2 f, | 2 f/p, 3 f, | 2 f/p, 2 f, | 2 f/p, 3 f, | 2 f/p, 2 f, |
| 2 f/s | 2 f/s, 2 p/a/s | 2 f/s | 2 f/s, 2 p/a/s | 2 f/s | 2 f/s, 2 p/a/s | 2 f/s | 2 f/s, 2 p/a/s | 2 f/s. 1 p/a/s | 2 f/s, 2 p/a/s | |
| Firing Chart – | Y | Y | Y | Y | Y | Y | Y | Y | Y | Y |
| Maximum Power – | 10 | 10 | 10 | 10 | 12 | 14 | 16 | 18 | 20 | 20 |
| Damage Modifiers: | ||||||||||
| +3 | (1-10) | (1-10) | (1-10) | (1-10) | (1-10) | (1-10) | (1-8) | (1-8) | (-) | (-) |
| +2 | (11-17) | (11-17) | (11-17) | (11-17) | (11-17) | (11-17) | (9-16) | (9-16) | (-) | (-) |
| +1 | (18-24) | (18-24) | (18-24) | (18-24) | (18-24) | (18-24) | (17-24) | (17-24) | (1-22) | (1-22) |
| Beam Weapon Type – | FH-12 | FH-12 | FH-3 | FH-3 | FH-17 | FH-11 | FH-3 | FNH-11 | – | FNH-11 |
| Number – | 1 | 1 | 1 | 1 | 1 | 1 | 1 | 1 | – | 1 |
| Firing Arcs – | 1 p/a/s | 1 f | 1 p/a/s | 1 f | 1 p/a/s | 1 f | 1 p/a/s | 1 f | – | 1 f |
| Firing Chart – | R | R | W | W | Y | Y | W | W | – | W |
| Maximum Power – | 6 | 6 | 5 | 5 | 6 | 10 | 5 | 13 | – | 13 |
| Damage Modifiers: | ||||||||||
| +3 | (-) | (-) | (1-10) | (1-10) | (1-10) | (1-10) | (1-10) | (1-7) | – | (1-7) |
| +2 | (1-9) | (1-9) | (11-17) | (11-17) | (11-17) | (11-17) | (11-17) | (8-15) | – | (8-15) |
| +1 | (10-16) | (10-16) | (18-20) | (18-20) | (18-24) | (18-24) | (18-20) | (16-20) | – | (16-20) |
| Torpedo Weapon Type – | FP-4 | FP-4 | FP-4 | FP-9 | FP-9 | FP-9 | FP-11 | FP-20 | FP-23 | FP-23 |
| Number – | 2 | 2 | 2 | 2 | 2 | 2 | 2 | 2 | 2 | 2 |
| Firing Arcs – | 2 f | 2 f | 2 f | 2 f | 2 f | 2 f | 2 f | 2 f | 2 f | 2 f |
| Firing Chart – | S | S | S | R | R | R | S | T | S | S |
| Power to Arm – | 1 | 1 | 1 | 1 | 1 | 1 | 1 | 1 | 1 | 1 |
| Damage – | 20 | 20 | 20 | 28 | 28 | 28 | 30 | 30 | 36 | 36 |
| Shield Data: | ||||||||||
| Deflector Shield Type – | FSP | FSP | FSP | FSP | FSS | FSQ | FNSL | FNSM | FNSM | FNSP |
| Shield Point Ratio – | 1/4 | 1/4 | 1/4 | 1/4 | 1/4 | 1/4 | 1/4 | 1/4 | 1/4 | 1/5 |
| Maximum Shield Power – | 16 | 16 | 16 | 16 | 20 | 30 | 33 | 37 | 37 | 35 |
| Combat Efficiency: | ||||||||||
| D – | 154.3 | 154.3 | 158.3 | 158.3 | 179.2 | 195.2 | 208.1 | 222.1 | 234.1 | 262.6 |
| WDF – | 104.4 | 115.1 | 105.7 | 124.6 | 127.9 | 158.3 | 155.2 | 191.6 | 189.0 | 200.0 |