«Last Updated on January 6, 2024 »
design by Atolm
NOTES:
Known Sphere Of Operation: Empire-wide use
Data Reliability: A for D-125A model, C for D-125C and D-125D models, D for D-125E and D-125G models, B for D-125H and D-125I models
Major Data Source: Klingon Sector Intelligence, Cardassian Sector Intelligence
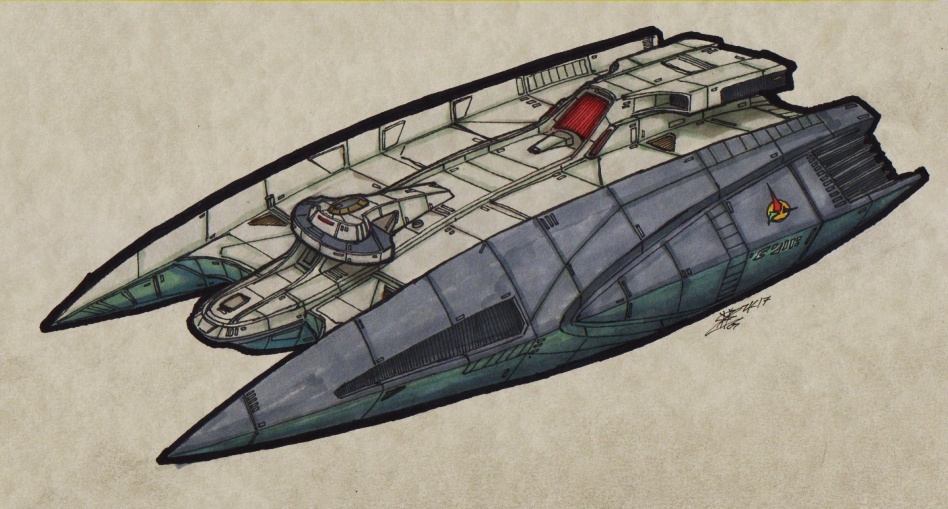
The D-125 has served the Empire for over 100 year as an effective and capable troop transport. Unlike other front-line cruiser, the D-125 does not use hypodermic capsules to store troops until needed. Four separate large troop barracks allow for quick deployment of troops when needed. While this does create somewhat cramped condition, may warriors find this preferable. This also allows for in-depth briefings before arrival at a combat location.
The Decimation was originally designed to fight the Kinshya, with the hope that the heavier firepower would allow for more effective engagement of Kinshya globe ships. The large quick-reaction ground force could also secure and destroy enemy installations and ground targets located on the few habitable planets within the void between Klingon and Kinshya space. While the D-125 proved effective against the dreaded globe ships of the Kinshya, ground units proved less effective. The D-125A’s heavier beam weapons were the equal to many Kinshya beam systems. However – most D-125s found themselves so evenly matched that a follow up attack was impractical or ill-advised. Only when operating with other Klingon support or escorts did the D-125 prove decisively victorious.
The next major usage of the D-125 was against the Federation during the 4-Year’s War where the powerful cruiser proved more effective in its primary mission role. The D-125A’s heavier armor and excellent firepower allowed it to attack small outposts quickly while fending off local defenses. Unfortunately, the D-125 was also a significant resource drain for the Empire, hastening the unsuccessful conclusion of the war. The D-125’s significant crew and troop requirements meant that operating far from established supply chains proved problematic. By wars end, 7 D-125’s had been destroyed in combat, with 2 more so badly damaged they were scrapped.
The D-125B proved ineffective in trial runs, showing little improvement over the A model. While 10 were built, all were recalled and converted immediately the the C model.
The D-125C saw a number of improvements over the A and B models. An improved main computer allowed for more accurate scanners and increased main weapon systems, including updating the primary disruptors to the popular KD-6. The original KD-3’s were moved to the port, starboard and aft weapon mounts. The C model also saw the installation of the KSK shielding system, providing improved power usage for the craft overall. Internally, the main barracks were rearanged, providing for a small recreation center and enlargement to the galley. While this resulted in a minor improvement in the morale of on-board marines, the ship was quickly considered underpowered for it’s role. With the imposition of the Organian Peace Treaty, many began to wonder if the D-125’s days were numbered. Despite misgivings, the craft proved useful in early 2270 against the Romulans after six D-125’s successfully destroyed a mining operation the Romulans were supporting. After driving off several in-system craft, the D-125’s successfully landed their troops and destroyed the shield systems. While the miners had fled, nearly all of their equipment – on loan from the Romulans – was captured or destroyed.
The D-125 would remain in service, although at a reduced operational capacity until 2285 when House Jurris proposed an upgrade to the aging craft. Jurris engineers had created an inboard version of the KWF-2 and proposed to install the system on the D-125. This would create room for a massively enlarged KIE-2 impulse drive, giving the Decimation class significantly more power. Upgraded to the aft weaponry and improved shields – the KSO system – rounded the improvements. In 2287, the first production models were launched and plans to increase production were put forward. The destruction of Praxis, however, ended operational production of the D-125 along with dozens of other designs. Unable to afford new builds – remaining D-125C’s were scheduled to be improved over the next 20 years.
In 2307, an improved and heavier version of the D-125 was created. To help offset some costs, the KD-6 disruptors were retained, with the aft weapons being replaced with KD-6’s as well. A new KP-3 torpedo system was also installed, giving the vessel a greater combat capability. Improvement to the shield system were – at the time – considered somewhat underwhelming, but were offset by the installation of the KCC cloaking device. This gave the cruiser the ability to approach potential targets without engaging in unnecessary combat and focus their ability on capturing enemy targets. Despite these improvements, the D-125E was not considered a success, and the class was again scheduled for retirement. However, ongoing conflicts with the Tzenkethi and Cardassians meant that many older designs were pressed into service to offset losses from those conflicts. In 2320, designers launched the D-125G, hoping to provide the Empire with a successful combat cruiser. The G model was still considered underwhelming for its class, with many other designs outperforming the D-125G. None the less, all remaining D-125’s were converted to the G model where they saw some success.
Even as the second conflict between the Klingons and Cardassians were coming to a close, designers felt that the D-125 could remain an active part of the fleet. The D-125H was launched in 2343 and sent into combat against the Cardassians. The cruisers improved computer and weapons allowed to engage Cardassian ships one-to-one and survive, while still retaining the ability to launch ground offensive. The Khitomer Massacre of 2346 stunned many in on the High Council. While constant combat engagements between the Romulans and Klingons had continued for many years, the destruction of Khitomer proved that the Empire continued to need front line ships of all caliber. The D-125H served well into the 2350’s before a proposal to upgrade the ship was made, again by house Jurris. The I model was intended to provide greater firepower and a more traditional “cruiser” platform for frontline combat. Nearly every system onboard was upgraded, including the weapons and shield, bringing the D-125 to specs equal to many of its contemporaries. New transporters were also installed, improving response times for the vessel.
The D-125I would see far more combat than any of its previous models. Many would participate in the short-lived but violent conflict between the Federation and Klingons and then go on to see multiple combats during the Dominion War. Like many other older designs, the D-125 would go on to see significant losses during the Dominion War, with over 30 destroyed and 18 begin scrapped after combat. With the conclusion of the conflict, the decision was finally made to retire the D-125 class. In later 2385, the last D-125 was decommissioned. Over the next five years, engineering students would completely automate the decommissioned hulls and they were used for war games.
A total of 254 D-125s were constructed. 7 As, 4 Cs, 2 Ds, 5 Es, 4 Gs, 6 Hs and 31 Is have been destroyed. 2 As, 3 Es, 1 G, 2 Hs and 18 Is have been scrapped. A further 79 Is were scrapped in war-game operations. 30 Gs and 25 Hs are currently in reserve fleets. 2 As have been captured (1 by Star Fleet and 1 by Romulan forces), 1 C has been captured by the Romulans, 1 G was captured by the Cardassians, and 2 Is have been captured by Dominion forces. 3 As, 1 C, 1 E and 4 Is are listed as missing. 10 Cs were traded to the Romulans and 10 Is are still in used as training vessels.