«Last Updated on December 15, 2023 »
design by Atolm
NOTES:
Known Sphere Of Operation: Empire-wide use
Data Reliability: C
Major Data Source: Romulan Sector Intelligence, Cardassian Sector Intelligence
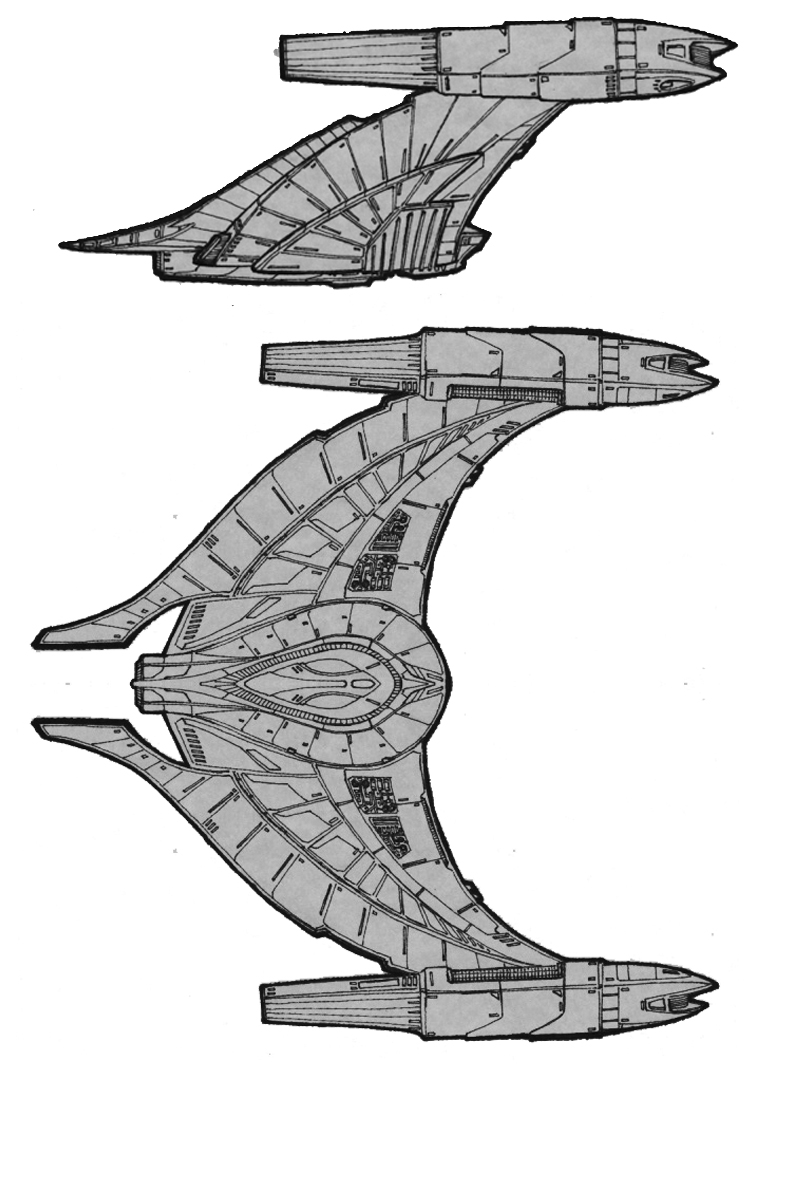
Another in a long list of improvements on the Romulan’s classic V-8 cruiser design, the V-80 was intended to counteract the combat capabilities of the ever-increasing number of Klingon front line combat vessels. Small, light and maneuverable, the V-80 used several non-traditional design elements to produce an effective combat platform that would serve the Empire for many years to come.
By the early 2270’s, the Romulans continued to need of an ever-increasing number of ships to counter Klingon aggression and provide security along the Federation Neutral Zone. Despite fervent production demands from Remus and other shipyards throughout the Star Empire, the Romulans were well aware that they lacked numbers when compared to their enemies. Designers continued to produce superior overall designs to their Klingon counterparts, but could not field warships nearly as fast as the Klingons. When the Klingons fielded the K-22 scout, the Romulans quickly discovered that multiple scaled versions of their scout would soon be seen along their border. Senators and Admirals alike knew that the Klingons could produce vast numbers of K-22’s while still maintaining their large-scale production of other battle-cruisers. Designers quickly put fourth multiple possibilities, many of which would see production. Many of these designs continued to be effective front-line vessels but could not be produced in vast numbers.
In 2281, the V-80 design was put forth to fleet planners, even as dozens of unarmed Klingon hulls were being purchased to bolster the Fleet. The V-80 utilized production techniques used by the Klingons to quickly mass produce the light cruiser. Production personnel secretly outsourced several non-vital components to elements in the Triangle, further shortening production times. When the first V-80’s were launched in 2284, Senate Appropriations were pleasantly surprised that no other vessel production had been affected. In fact, production of other ships had increased despite the inclusion of the V-80 to the main line ship building efforts.
The Type 1 and Type 2 were both fielded with a traditional RWC warp drive system. Reliable and in its second generation, the RWC gave the V-80 good combat power, while it’s sub-systems required less internal space than other warp systems. The V-80 also took the unusual course of using two independent impulse drives, rather than the traditional single large drive. Designers believed that during combat, at least one of the units would remain on-line should the other be damaged. The V-80 utilized a wide range of offensive systems, giving fleet commanders multiple choices during combat. Two independent torpedo launchers were fitted to the outside of the warp nacelles. A large plasma torpedo was centrally located. Four main heavy disruptors were fitted, along with two lighter phasers. Each of the combat systems had multiple redundancies, forcing the inclusion of a large crew. Non the less, the design proved effective and the V-80 would see combat almost immediately.
In early 2300, production was slowing on the V-80 in favor of larger combat vessels. Many began to feel that larger cruisers and battleships could engage multiple Klingons bird-of-prey vessels effectively. While not proven in combat, this philosophy forced backers of the V-80 to look for alternatives. In 2309, the RWI warp drive was paired with the quantum-singularity plasma system. The RWI provided a massive jump in overall speed, making the V-80 one of the fastest Romulan cruiser of its day. The smaller support system also allowed the inclusion of the massive RID-3 impulse drive. The V-80 became more maneuverable and better defended with the inclusion of the RSO shield system. The main torpedoes were increased to the more powerful RP-4. A special magazine feed system was also installed along the main nacelle support strut that allowed additional torpedoes to be moved from internal storage to the torpedo wing magazines during combat. The following year, the Type-4 was launched, increasing the shields and main plasma torpedo. While both versions remained in production, the Type4 was their preferred variant. Older Type 1s and 2s was easier to upgrade to the Type-3, however, and most in service were refit by 2320.
Designers eventually decided to do away with the plasma torpedo system, replacing it with a main-line torpedo launcher. This gave the Type-5 surprising mid-range flexibility, further allowing the V-80 to better counter the large numbers of light and medium Klingon attack vessels they continued to face. The Type-6 saw an increase in the secondary weapon systems and shields, while the Type-7 saw an increase in all the weapon systems as well as further shield improvements.
The V-80 continued to serve well into the return of the Star Empire to the political stage in the 2360s. However, it’s smaller size and lighter shields meant that the V-80 needed to operate in large numbers to effectively repel larger vessels. Many were pulled from front-line operations well before the 2360s and were placed in active reserve fleets. Some hulls were well over 80 years old by the time of the Dominion War. However, the V-80 became an effective Dominion fighter during the war, easily matching many Dominion ships in combat. By wars end, a large number of V-80’s had been severely damaged, and most were retired by 2380.
| Construction Data: | |||||||
| Model – | Type 1 | Type 2 | Type 3 | Type 4 | Type 5 | Type 6 | Type 7 |
| Ship Class – | VI | VI | VI | VI | VI | VI | VI |
| Date Entering Service – | 2284 | 2288 | 2309 | 2310 | 2327 | 2333 | 2343 |
| Number Constructed – | 132 | 154 | 37 | 63 | 23 | 38 | 31 |
| Hull Data: | |||||||
| Superstructure Points – | 19 | 19 | 23 | 23 | 23 | 23 | 24 |
| Damage Chart – | B | B | B | B | B | B | B |
| Size: | |||||||
| Length – | 136.2 m | 136.2 m | 136.2 m | 136.2 m | 136.2 m | 136.2 m | 136.2 m |
| Width – | 153.4 m | 153.4 m | 153.4 m | 153.4 m | 153.4 m | 153.4 m | 153.4 m |
| Height – | 144.6 m | 144.6 m | 144.6 m | 144.6 m | 144.6 m | 144.6 m | 144.6 m |
| Weight – | 79,556 mt | 79,556 mt | 77,715 mt | 78,225 mt | 78,645 mt | 79,130 mt | 79,457 mt |
| Cargo: | |||||||
| Total SCU – | 125 SCU | 125 SCU | 125 SCU | 125 SCU | 125 SCU | 125 SCU | 125 SCU |
| Cargo Capacity – | 6,250 mt | 6,250 mt | 6,250 mt | 6,250 mt | 6,250 mt | 6,250 mt | 6,250 mt |
| Landing Capacity – | None | None | None | None | None | None | None |
| Equipment Date: | |||||||
| Control Computer Type – | R5M | R5M | R5M | R5M | R5M | R5M | R5M |
| Transporters: | |||||||
| Standard 9-person – | 2 | 2 | 2 | 2 | 2 | 2 | 2 |
| Emergency 20-person – | 1 | 1 | 1 | 1 | 1 | 1 | 1 |
| Cargo – | 1 | 1 | 1 | 1 | 1 | 1 | 1 |
| Cloaking Device Type: | RCC | RCC | RCC | RCC | RCC | RCC | RCC |
| Power Requirements: | 15 | 15 | 15 | 15 | 15 | 15 | 15 |
| Other Data: | |||||||
| Crew – | 68 | 73 | 75 | 82 | 86 | 88 | 90 |
| Passengers – | 15 | 10 | 10 | 10 | 10 | 10 | 5 |
| Shuttlecraft – | 1 | 1 | 1 | 1 | 1 | 1 | 1 |
| Engines And Power Data: | |||||||
| Total Power Units Available – | 40 | 40 | 46 | 46 | 46 | 46 | 46 |
| Movement Point Ratio – | 3/1 | 3/1 | 2/1 | 2/1 | 2/1 | 2/1 | 2/1 |
| Warp Engine Type – | RWC-2 | RWC-2 | RWI-1 | RWI-1 | RWI-1 | RWI-1 | RWI-1 |
| Number – | 2 | 2 | 2 | 2 | 2 | 2 | 2 |
| Power Units Available – | 15 ea. | 15 ea. | 11 ea. | 11 ea. | 11 ea. | 11 ea. | 11 ea. |
| Stress Chart – | N/Q | N/Q | L/M | L/M | L/M | L/M | L/M |
| Max Safe Cruising Speed – | Warp 6 | Warp 6 | Warp 8 | Warp 8 | Warp 8 | Warp 8 | Warp 8 |
| Emergency Speed – | Warp 7 | Warp 7 | Warp 9 | Warp 9 | Warp 9 | Warp 9 | Warp 9 |
| Impulse Engine Type – | RIB-3 (x2) | RIB-3 (x2) | RID-3 (x2) | RID-3 (x2) | RID-3 (x2) | RID-3 (x2) | RID-3 (x2) |
| Power Units Available – | 5 ea. | 5 ea. | 12 ea. | 12 ea. | 12 ea. | 12 ea. | 12 ea. |
| Weapons And Firing Data: | |||||||
| Beam Weapon Type – | RB-9 | RB-10 | RB-10 | RB-10 | RB-11 | RB-11 | RB-12 |
| Number – | 4 | 4 | 4 | 4 | 4 | 4 | 4 |
| Firing Arcs – | 2 f/p, 2 f/s | 2 f/p, 2 f/s | 2 f/p, 2 f/s | 2 f/p, 2 f/s | 2 f/p, 2 f/s | 2 f/p, 2 f/s | 2 f/p, 2 f/s |
| Firing Chart – | W | U | U | U | V | V | W |
| Maximum Power – | 6 | 8 | 8 | 8 | 9 | 9 | 9 |
| Damage Modifiers: | |||||||
| +3 | (1-8) | (1-8) | (1-8) | (1-8) | (1-10) | (1-10) | (1-10) |
| +2 | (9-16) | (9-16) | (9-16) | (9-16) | (11-16) | (11-16) | (11-15) |
| +1 | (17-20) | (17-20) | (17-20) | (17-20) | (17-21) | (17-21) | (16-20) |
| Beam Weapon Type – | RB-5 | RB-6 | RB-6 | RB-5 | RB-9 | RB-10 | RB-10 |
| Number – | 2 | 2 | 2 | 2 | 2 | 2 | 2 |
| Firing Arcs – | 2 p/f/s | 2 p/f/s | 2 p/f/s | 2 p/f/s | 2 p/f/s | 2 p/f/s | 2 p/f/s |
| Firing Chart – | V | T | T | V | W | U | U |
| Maximum Power – | 5 | 6 | 6 | 5 | 6 | 8 | 8 |
| Damage Modifiers: | |||||||
| +3 | (1-10) | (-) | (-) | (1-10) | (1-8) | (1-8) | (1-8) |
| +2 | (11-16) | (1-18) | (1-18) | (11-16) | (9-16) | (9-16) | (9-16) |
| +1 | (17-21) | (-) | (-) | (17-21) | (17-20) | (17-20) | (17-20) |
| Torpedo Weapon Type – | RP-3 | RP-3 | RP-4 | RP-4 | RP-5 | RP-5 | RP-6 |
| Number – | 2 | 2 | 2 | 2 | 3 | 3 | 3 |
| Firing Arcs – | 2 f | 2 f | 2 f | 2 f | 3 f | 3 f | 3 f |
| Firing Chart – | Q | Q | P | P | R | R | M |
| Power to Arm – | 1 | 1 | 1 | 1 | 1 | 1 | 1 |
| Damage – | 10 | 10 | 12 | 12 | 15 | 15 | 18 |
| Torpedo Weapon Type – | RPL-3 | RPL-3 | RPL-3 | RPL-4 | – | – | – |
| Number – | 1 | 1 | 1 | 1 | – | – | – |
| Firing Arcs – | 1 f | 1 f | 1 f | 1 f | – | – | – |
| Firing Chart – | T | T | T | T | – | – | – |
| Power to Arm – | 8 | 8 | 8 | 12 | – | – | – |
| Damage – | RL-3 | RL-3 | RL-3 | RL-4 | – | – | – |
| Shield Data: | |||||||
| Deflector Shield Type – | RSK | RSK | RSO | RSP | RSP | RSU | RSY |
| Shield Point Ratio – | 1/2 | 1/2 | 1/3 | 1/3 | 1/3 | 1/3 | 1/3 |
| Maximum Shield Power – | 14 | 14 | 15 | 18 | 18 | 25 | 28 |
| Combat Efficiency: | |||||||
| D – | 85.2 | 85.2 | 151.4 | 155.9 | 155.9 | 166.4 | 172.3 |
| WDF – | 60.5 | 62.5 | 64.5 | 69.6 | 71.1 | 72.1 | 74.5 |